Change Folder Permissions in Windows 10 and 11
Published on May 2, 2024 ( Last Updated on December 24, 2025 ) | 3 min read
Disclaimer
The instructions detailed below involve modifications to the security policies implemented by your organization. By proceeding with these instructions, the individual performing the modifications accepts all responsibility for the actions and their consequences. It is crucial to ensure authorization from your organization before making any changes.
This information is provided for informational purposes only. Prior to implementing any changes, approval should be obtained from the party responsible for security within your organization. The content here does not supersede any internal policies or guidelines and should be treated as a supplementary resource.
Prerequisites
Before you begin, make sure you have the following prerequisites:
- Administrative access to the system where the folder is located or assistance of an IT department administrator.
- Familiarity with the folder structure of your device and the specific NIVOMAX Library Location (Library Data Store) folder you want to configure.
- Knowledge of the existing permissions on the folder.
Identifying the Folder
To start, identify the folder for which you must configure permissions. This is the folder you selected as the Data Root during the NIVOMAX installation procedure or the one manually configured within the NIVOMAX Viewer using the Settings >> Locations >> Library Location option.
- Navigate to the location of the folder within the file system.
- Note the folder’s name and its path for reference.
Step 1: Open File Explorer
Windows 10: Press Win + E to open File Explorer.
Windows 11: Press Win + E or click on the File Explorer icon on the taskbar.
Step 2: Locate the Folder
Navigate to the folder you identified in step ‘Identifying the Folder‘.
Step 3: Access Properties
Right-click on the folder and select “Properties” from the context menu.
Step 4: Go to the Security Tab
In the Properties window, click on the “Security” tab. This tab will show the current security settings for the folder.
Step 5: Edit Permissions
Click on the “Edit” button under the “Group or user names” box. This will open a new window where you can modify permissions.
Step 6: Modify Permissions

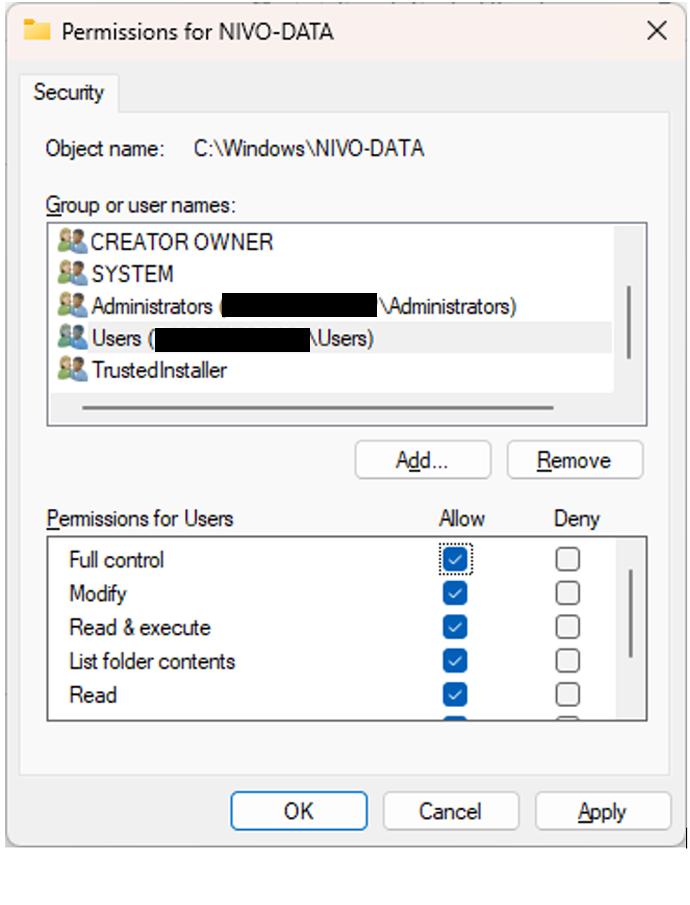
In the “Permissions for [Folder Name]” window, you’ll see a list of user groups and users along with their respective permissions.
[Folder Name] is the folder you identified in step ‘Identifying the Folder‘.
Select a user or group from the list. Then, check or uncheck the boxes under “Allow” or “Deny” to configure the desired permissions. Typical permissions include:
- Full Control: Allows reading, writing, changing, and deleting of the file or folder.
- Modify: Allows everything in ‘Full Control’ except changing permissions and ownership.
- Read & Execute: Allows viewing and running files in a folder.
- List Folder Contents: Allows viewing the contents of a folder.
- Read: Allows viewing the folder’s contents and its properties.
- Write: Allows writing to a folder.
Step 7: Apply the Changes
Click “Apply” to set the new permissions.
Click “OK” to close the Permissions window.
Click “OK” again to close the Properties window.
Step 8: Advanced Permissions (Optional)
For more detailed permission settings, in the Security tab, click on “Advanced”.
Here, you can set detailed permissions, take ownership, and set inheritance options.
Tips for Managing Permissions
- Backup Important Data: Before changing permissions, it’s a good idea to backup important data in the folder.
- Administrator Rights: You may need administrator privileges to change permissions for certain files and folders.
- Inheritance: Permissions can be inherited from parent folders. Be mindful of this as changes at a higher level can propagate to subfolders.

